Computer vision : object detection and identification with Python, OpenCV and YOLOv4. Part 1: basic image processing.
In this post, we will run the YOLO algorithm with Python and the OpenCV OpenSource Computer Vision) library, which is widely used with Python.
YOLO (You Only Look Once) is an algorithm initialy developed by Joseph Redmon in 2016. Its fourth version, YOLOv4 was published by Alexey Bochkovskiy, Chien-Yao Wang, Hong-Yuan Mark Liao in 2020. YOLO is based on a sophisticated neural network called Darknet. The aim of YOLO is to recognize, identify and locate objects in images while being a very good tradeoff between detection performance and speed.
We will work with a pre-trained model that detects and to recognize the 80 objects of the COCO dataset.
We will assume that your system runs Linux or MacOS with a recent version of Python (>=3.6) installed, for example with Pyenv.
Project structure
					tree
.
|____input
|____output
|____yolo.py
|____yolo-files
| |____coco.names
| |____yolov4.cfg
| |____yolov4.weights
- Python dependencies:
Install the OpenCV module :
pip install opencv-python
- YOLOv4 components:
The yolo-files folder contains the files that define the YOLOv4 algorithm. They can be downloaded as follows:
					wget https://github.com/AlexeyAB/darknet/releases/download/darknet_yolo_v3_optimal/yolov4.cfg -P yolo-files # configuration
wget https://github.com/AlexeyAB/darknet/releases/download/darknet_yolo_v3_optimal/yolov4.weights -P yolo-files # weights
wget https://github.com/AlexeyAB/darknet/blob/master/data/coco.names -P yolo-files # labels
The code :
Edit the yolo.py script so that it contains the following:
					import cv2
import numpy as np
import argparse
import os


class YoloObjectDetector:
    def __init__(self, yolo_path):

        with open(os.path.join(yolo_path, "coco.names"), "r") as f:
            self.labels = f.read().splitlines()

        self.colors = np.random.uniform(0, 255, size=(len(self.labels), 3))

        net = cv2.dnn.readNetFromDarknet(
            os.path.join(yolo_path, "yolov4.cfg"),
            os.path.join(yolo_path, "yolov4.weights"),
        )
        self.model = cv2.dnn_DetectionModel(net)

        self.model.setInputParams(scale=1 / 255, size=(416, 416), swapRB=True)

    def process_image(
        self,
        image,
        detection_threshold=0.5,
        non_maximum_suppression_msthreshold=0.5,
    ):
        classids, scores, boxes = self.model.detect(
            image,
            confThreshold=detection_threshold,
            nmsThreshold=non_maximum_suppression_msthreshold,
        )
        texts = []
        for (classid, score, box) in zip(classids, scores, boxes):
            cv2.rectangle(
                image,
                (box[0], box[1]),
                (box[0] + box[2], box[1] + box[3]),
                color=self.colors[classid],
                thickness=2,
            )

            text = "%s: %.2f" % (self.labels[classid], score)
            cv2.putText(
                image,
                text,
                (box[0], box[1] - 5),
                cv2.FONT_HERSHEY_SIMPLEX,
                1,
                color=self.colors[classid],
                thickness=4,
            )
            texts.append(text)
        return texts


def parse_args():
    parser = argparse.ArgumentParser(description="Process some images")
    parser.add_argument(
        "-i", "--image", required=True, help="path to input image"
    )
    parser.add_argument(
        "-o", "--output", default="output", help="path to output files"
    )
    parser.add_argument(
        "-y", "--yolopath", default="yolo-files", help="path to yolo files"
    )
    parser.add_argument(
        "-d",
        "--detthreshold",
        type=float,
        default=0.5,
        help="detection threshold",
    )
    parser.add_argument(
        "-n",
        "--nmsthreshold",
        type=float,
        default=0.5,
        help="non-maximum suppression threshold",
    )

    return vars(parser.parse_args())


def main():

    args = parse_args()
    image_path = args["image"]
    output_image_path = args["output"]
    yolopath = args["yolopath"]
    detection_threshold = args["detthreshold"]
    non_maximum_suppression_msthreshold = args["nmsthreshold"]

    detection_model = YoloObjectDetector(yolopath)
    input_image = cv2.imread(image_path)
    output_image = input_image.copy()
    detection_model.process_image(
        output_image,
        detection_threshold,
        non_maximum_suppression_msthreshold,
    )
    output_file_name = os.path.join(
        output_image_path,
        os.path.splitext(os.path.basename(image_path))[0]
        + "_output"
        + os.path.splitext(image_path)[1],
    )
    cv2.imwrite(output_file_name, output_image)
    print("{outputFile} created !".format(outputFile=output_file_name))


if __name__ == "__main__":
    main()
The script can be launched with the following parameters:
-h displays help on the parameters,
-i is followed by the path of the image,
-o is followed by the path to the folder where the output images will be saved,
-y is followed by the path of the folder that contains the YOLO model files,
-d is followed by the detection threshold (0.5 by default),
-n is followed by the non-maximum suppression threshold.
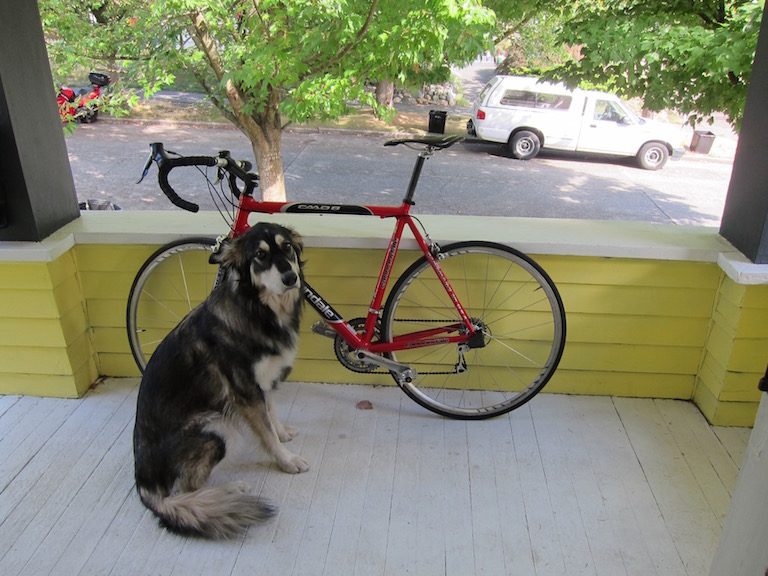
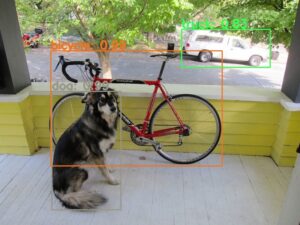
Place an image in the input folder, for example the image dog.jpeg and launch our script :
					○ → python yolo.py -i images/dog.jpeg -o output -y yolo-files
output/dog_output.jpeg created !
A new image file dog_output.jpeg for our example is created in the output folder image file.
How the script works :
The main part of this script is the YoloObjectDetector class. which creates an instance of a YOLO detector via OpenCV and defines a method (object_detects) to implement it. The code is divided in 3 parts :- lines 7-51 : definition of the YoloObjectDetector class. – lines 8-21 : characteristics of the YOLO object detector in OpenCV: configuration, weight, labels of the objects, input parameters. – lines 23-55 : definition of the object_detect method which takes as parameters :
-
- an image,
- and two parameters of this instance:
- confidence detection threshold
- the non-maximum predictions (NMS) filtering threshold (A new image file dog_output.jpeg for our example is created in the output folder image file. When an object is detected in several overlapping areas, the nms function allows to select the one with the best confidence level).
- lines 58-84: creation of a parser to process the arguments of the command line script
- lines 87-111: main function of the script : handling the arguments, creating the detection model and calling the detection function, then writing the output file.
- lines 114:115 : execution of the script
Final word:
We encourage you to test the script with several images and especially different threshold values.
Once pre-trained, the YOLO algorithm is very easy to implement with the Python/OpenCV: it allows to obtain quickly exploitable results. We will see soon how to go further in this domain.